If like me, you have been unfortunate enough to break the flybar (i've done this twice now) on your Honeybee FP helicopter, here are some simple(ish) instructions to replace the flybar with a new one. For your information you can click the images to see larger versions in my photo album. You can also view all the images at this location...
http://picasaweb.google.co.uk/Claud.Fiore/FlyBarPics
You will also require a small phillips style screwdriver and the L type allen key supplied with your helicopter when you purchased it. You might also require a small set of pliers, although I don't use them, they can be useful to help re-tighten or loosen the paddles.
Ok so lets get cracking!
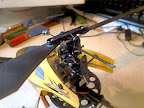
- Un-clip the ring type connectors which hold the main blade to the fly-bar. And then gently remove the main blade by un-clipping it from the ball type joints.
- Un-link the paddle control ring type connector from the paddle control frame, you can leave them connected to the bottom saves hunting around for them later on!
- Remove the paddles and fly-bar weights from the broken flybar and store them safely while we do the next few steps
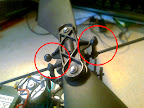
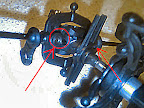
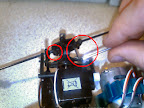
- Under the fly-bar control frame there are two small grub screws holding the fly-bar in place. These need to be loosened (but not completely removed as they are complete buggers to get back in and take ages to find if you accidentally drop one! Believe me I know, been there, done that! The images below show the location of the grub screws, and an action photo (LOL) of me unscrewing one of them with the allen key.

- With the grub screws loosened you can now twist and pull the broken fly-bar out of the control frame. And remove the outer control frame which drops down once the fly-bar is removed.
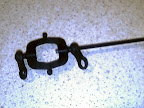
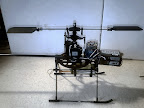
- Once you have done that you will be left with the centre control frame hub clear and ready to insert the new flybar.
- Partially insert the new fly-bar into the outer paddle control frame, I found that this made it easier to get the frame and flybar back into position on the centre hub.
- With the new fly-bar partially inserted into the paddle control frame you can now position the control frame back over the centre hub and locate the fly-bar into the hole through the centre hub. Ensure you get the fly-bar through the hole, because as I found the helicopter fly's very strangely if you get this bit wrong!
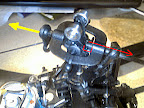
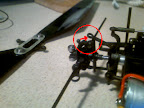
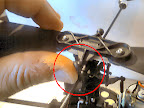
The red arrow shows the direction you should pull the fly-bar out so that the frame can be positioned over the centre hub, and the yellow arrow shows where the fly-bar should come out from when inserted. Once you have done this the flybar should be positioned as is in the next pic, and we are ready to balance the flybar.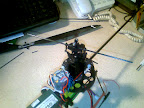
- I found the easiest way to balance the flybar was to put the weights and paddles back onto the fly-bar and using them as counter weights to get the balance right.
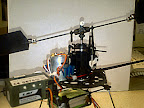
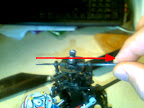
Put the paddles on pointing vertically upwards (so that the weight is better for balancing) and ensure they are pushed onto the fly-bar as far as they will go, and then move the weights right out to the paddles and tighten them (enough to hold them in place). Try not to over tighten the weights as this is likely to crack the flybar and you'll find yourself going through this whole procedure again a lot sooner than intended! - With the paddles and weights in place push and/or pull the flybar one way or the other until both paddles are level and do not tip one way or the other. It's a good idea to do this bit on a nice flat stable surface. I found that bouncing the tip of one paddle and adjusting until the balance was correct. The picture below shows my fly-bar balanced using this exact method.
- With the fly-bar now balanced, carefully turn the helicopter on to its side (ensuring that the balance is not messed up) and re-tighten the grub screws we loosened earlier. Remember once again, don't over tighten the grubs as this is likely to squash the fibre rod and again weaken it! Just tight enough to hold the fly-bar in place.
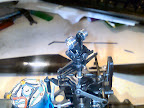
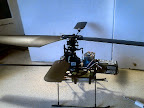
- Now you can stand the helicopter back onto its skids and position the paddles and re-tighten them again. You might need the small pliers to hold the tiny nuts under the paddles while you tighten them. Below is my heli with the fly-bar replaced and paddles all sorted!
- Replace the main blade by positioning it onto the silver "ball" like connectors and gently pushing until you kind of feel it click into place. You'll know once the blade is back in position. Then you can re-connect the ring type connectors which hold the blade to the flybar.
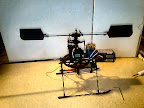
- And there you go, you're almost done! Just need to put the canopy back on and your heli fly-bar is repaired / replaced with a new one!
I hope you find these instructions useful, There are many out there, but I thought another set of instructions (and possibly another way of doing things) is always good!
Happy Flying!

16 comments:
I'm really lost. I can't even get past the first step - removing the top blade assembly. You say "Un-clip the ring type connectors which hold the main blade to the fly-bar. And then gently remove the main blade by un-clipping it from the ball type joints."
I've unhooked the two ball joints, but what are the ring type connectors? I don't see any rings up in the head?
Hi Ryan,
The ring type connectors (as named by the manual that comes with the Esky Honeybee) are the things you've unhoooked! The ball type joints you cant see when the blade is on, they are what the main blade is held on by. Hope this makes a bit more sense!
If you put the flybar control frame back on but upside down then you will have the crub screws uppermost facing you and this would make them easier to tighten.
Thats a great idea, not sure how that effects the heli, but it looks like it works, and has no adverse effect. I'm going to do that myself! Thanks for your comment.
Hi mate, that was meant to read as "grub" not "crub" screw.It will work. Get yourself over here:
http://www.heliguy.com/Forum/honeybee-fixed-pitch-f72.html
If you have the HBFP.
Cheers,
Irishrover63.
I reversed the frame on mine and it works fine, it was me who posted. Have you been over to the Heliguy HBFP forum yet, a wealth of info on there?
Hello, I cant get my flybar out. Its broken so close to the control tray. There is no piece to put the fly bar out. Any ideas how to remove it. Thanks
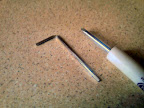
Hi Anon... I would suggest using a small rod or something similar to push the old broken flybar piece through. I used the new flybar to push the old bit through when both side of mine broke right at the hub hole! good luck.
Thanks i removed it out.
Hi
When you fit the new flybar and have it balanced is there a particular angle the paddles need to be postioned at??
thanks
You need to have the paddles both set at 0 degrees, or flat with no angle of attack. Cheers. Paul, Auckland, N.Z
great guide.
i recently bought a honeybee fixed pitch and i crashed. ended up breaking off 1 of the flybars. helped alot
thanks
Thanks! I got outer control frame broken. But getting it changed requires exactly all the same steps as changing flybar.
- Thank you so much
Btw. My first crash...
I have broken at least 5 or 6 of those carbon fly-bar rods myself, but I have worked myself out of the problem now. No, not because I have gotten good at it, but because I have replaced the carbon fly-bar with a metal one. The simpliest way to do this is to get one of those fly-bars meant for the Mini-Titan 450 sized heli. It will be a direct fit, except the length will be longer! It is now a longer, slightly heavier (both contributing to make it more stable) fly bar , but an indestructible one. :)
FirstFlight thats a great idea, I think that when I finally get my honeybee back I'll try the same.
Post a Comment