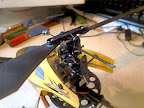
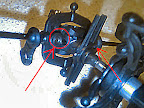
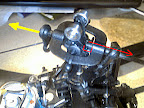
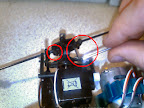
If you hear a whirring or whizzing noise coming from your honeybee helicopter's tail rotor then more than likely the rubber grommet that holds the tail blade to the gear has loosened and needs to be pushed back to lock the tail rotor back into the drive gear.
The drive gear has holes around the inner circumference which the tail gear locks into when it is properly in place. If the grommet comes loose the the gear can disengage from the motor pinion and the tail rotor will not spin correctly.
Another cause can be that the tail rotor's little pegs (which slot into the drive gear) have broken or worn due to the grommet being loose too often and the tiny pegs not engaging correctly into the gear.
To push the grommet back on properly you should push the stem that the gear and blade go over towards the gear and at the same time push the grommet towards the tail blade.
Be carful not to make too tight a connection between the blade and the gear as this can cause the bearing to jam which can put unnecessary strain on the shaft which will (or can) shear it. Been there done that, bought a new gear mount and gear!
You can purchase a spare at buzzflyer (click on the image)
Tuesday, 22 January 2008
Whizzing or whirring sound or noise from tail rotor on an ESky Honey Bee helicopter
Friday, 18 January 2008
How to Replace a broken fly-bar on an ESky Honey Bee FP helicopter
If like me, you have been unfortunate enough to break the flybar (i've done this twice now) on your Honeybee FP helicopter, here are some simple(ish) instructions to replace the flybar with a new one. For your information you can click the images to see larger versions in my photo album. You can also view all the images at this location...
http://picasaweb.google.co.uk/Claud.Fiore/FlyBarPics
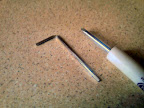
You will also require a small phillips style screwdriver and the L type allen key supplied with your helicopter when you purchased it. You might also require a small set of pliers, although I don't use them, they can be useful to help re-tighten or loosen the paddles.
Ok so lets get cracking!
- Un-clip the ring type connectors which hold the main blade to the fly-bar. And then gently remove the main blade by un-clipping it from the ball type joints.
- Un-link the paddle control ring type connector from the paddle control frame, you can leave them connected to the bottom saves hunting around for them later on!
- Remove the paddles and fly-bar weights from the broken flybar and store them safely while we do the next few steps
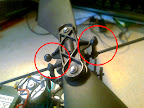
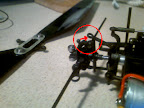
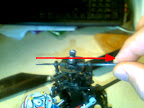
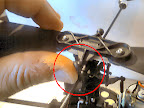
- Under the fly-bar control frame there are two small grub screws holding the fly-bar in place. These need to be loosened (but not completely removed as they are complete buggers to get back in and take ages to find if you accidentally drop one! Believe me I know, been there, done that! The images below show the location of the grub screws, and an action photo (LOL) of me unscrewing one of them with the allen key.

- With the grub screws loosened you can now twist and pull the broken fly-bar out of the control frame. And remove the outer control frame which drops down once the fly-bar is removed.
- Once you have done that you will be left with the centre control frame hub clear and ready to insert the new flybar.
- Partially insert the new fly-bar into the outer paddle control frame, I found that this made it easier to get the frame and flybar back into position on the centre hub.
- With the new fly-bar partially inserted into the paddle control frame you can now position the control frame back over the centre hub and locate the fly-bar into the hole through the centre hub. Ensure you get the fly-bar through the hole, because as I found the helicopter fly's very strangely if you get this bit wrong!
The red arrow shows the direction you should pull the fly-bar out so that the frame can be positioned over the centre hub, and the yellow arrow shows where the fly-bar should come out from when inserted. Once you have done this the flybar should be positioned as is in the next pic, and we are ready to balance the flybar.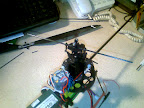
- I found the easiest way to balance the flybar was to put the weights and paddles back onto the fly-bar and using them as counter weights to get the balance right.
Put the paddles on pointing vertically upwards (so that the weight is better for balancing) and ensure they are pushed onto the fly-bar as far as they will go, and then move the weights right out to the paddles and tighten them (enough to hold them in place). Try not to over tighten the weights as this is likely to crack the flybar and you'll find yourself going through this whole procedure again a lot sooner than intended! - With the paddles and weights in place push and/or pull the flybar one way or the other until both paddles are level and do not tip one way or the other. It's a good idea to do this bit on a nice flat stable surface. I found that bouncing the tip of one paddle and adjusting until the balance was correct. The picture below shows my fly-bar balanced using this exact method.
- With the fly-bar now balanced, carefully turn the helicopter on to its side (ensuring that the balance is not messed up) and re-tighten the grub screws we loosened earlier. Remember once again, don't over tighten the grubs as this is likely to squash the fibre rod and again weaken it! Just tight enough to hold the fly-bar in place.
- Now you can stand the helicopter back onto its skids and position the paddles and re-tighten them again. You might need the small pliers to hold the tiny nuts under the paddles while you tighten them. Below is my heli with the fly-bar replaced and paddles all sorted!
- Replace the main blade by positioning it onto the silver "ball" like connectors and gently pushing until you kind of feel it click into place. You'll know once the blade is back in position. Then you can re-connect the ring type connectors which hold the blade to the flybar.
- And there you go, you're almost done! Just need to put the canopy back on and your heli fly-bar is repaired / replaced with a new one!
I hope you find these instructions useful, There are many out there, but I thought another set of instructions (and possibly another way of doing things) is always good!
Happy Flying!
Sunday, 13 January 2008
ESky Honey Bee FP Demo video Courtesy of ESky
E Sky HoneyBee FP (Fixed pitch) Demo video by ESky. Courtesy of www.buzzflyer.com.
It's all free advertising! This video was freely available from the ESky / BuzzFlyer.com web site and shows what a nice RC helicopter the Honeybee FP really is. Have fun. The link goes to the video hosted by BuzzFlyer.com. (Thanks BuzzFlyer!)
Honey Bee FP Blade Tracking... - WattFlyer RC Electric Flight Forums - Discuss radio control eflight
Honey Bee FP Blade Tracking... - WattFlyer RC Electric Flight Forums - Discuss radio control eflight
I found this interesting thread on WattFlyer forums. Very useful information here regarding blade balancing and tracking. Very detailed information given regarding the Honeybee FP and CP helicopters. A useful read for all RC helicopter pilots. An interesting picture on how to adjust the blade tracking on the Honeybee which was posted by one of the forum members.
(Image courtesy of seaking63 http://www.wattflyer.com/forums/member.php?u=10369)
Although I have not experienced this kind of wobble yet, but I suspect I surely will once I damage the main rotor blades and have to replace them!
Saturday, 12 January 2008
How to fit the training kit Honeybee and Honeybee CP (and other ESky Helicopters
Training kits are very important for beginners as they allow the beginner to learn how to hover and control their RC helicopter without doing too much damage to the helicopter.
If you purchase the standard kit (e.g. from BuzzFlyer available for purchase at this link... http://www.buzzflyer.co.uk/RC-Helicopter-Accessories-&-Upgrades/Training-Kits/c-1-90-106/) for the Honeybee and Honeybee CP which has the black clips with it, then fitting could not be simpler. Other helicopters training kit fitting is also similar to this.
You should have the folloing with the training kit...

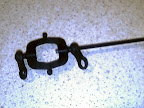
- 4 clips (they attach to the skids)
- 4 bars
- 4 balls (they stop the bars catching on carpet or digging into the ground etc)
- The training kit hub centre piece
- 8 small grommet like rubber tube pieces. (In the pic they are already holding the balls in place!)
To fit this type of kit...
- Clip the four clips onto the skids by by sliding the vertical bar of the skid into the slot and then hooking the base skid section into the clip. This is then secured by turning the clip upwards until it (kind of) clips over the vertical skid bar.


- Put the helicopter (with clips attached) on a flat surface and place the training kit hub centre so that when the rods are attached they kind of point down and out from the centre of the helicopter base.
- Get one of the training kit rods and pass it through the hole in one of the clips from the outside of the skids towards the hub, and then locate it into one of the hub slots and push it in as far as it will go. The bar should be a snug fit.

- Repeat step 3 for each of the other bars until all four are attached to the hub.
- Take four of the grommet like rubber tubes and slide them onto each bar (one each) about 4 to 5 cm's.

- Locate the balls (one per bar) and use the remaining rubber grommet like tubes to hold the balls in place.
- Voila! Your ready to start flying.


If your helicopter training kit doesn't come with clips or your helicopter has flat style skids that the clips wont fit onto or over, then you can use wire tidies (the zip style placstic slip things) or even some tape to secure the assembled training kit to the base of the skids. The bars of the kit should be on top of the skids base (not below it!)
One thing to remember is that once attached the hub of the training kit should be centred to the body of the helicopter to maintain balance. The kit does add unnecessary weight to the helicopter, but they are necessary if you are a complete novice at flying (as I am).
Happy flying!
Wednesday, 9 January 2008
Beginners Flying tips Honeybee FP by a beginner!
Here are some of my flying tips as a beginner and very inexperienced RC Helicopter pilot. If you have just received your Honeybee helicopter and have got it out of the box here are a couple of my tips beginner to beginner!
- Before you do anything at all read the eFlight Wiki for the Honeybee FP helicopter by clicking on this following link... http://www.eflightwiki.com/eflightwiki/index.php?title=HoneyBeeFP
- Get a few spare bits and pieces. I find the most vulnerable parts are definitely the rear vertical tail fin and attachment, and also the ring like push rod links for the main rotor blade. (They attach the main rotor blade to the flybar). These little plastic components break easily if the main rotor is forced off in a crash. I have broken 4 of these already! See below for recommended parts links to BuzzFlyer.
- If you haven't got the training gear (to extend the base of the helicopter) then I wholly recommend you get them and fit them. The Wiki has ideas for making a set. But without these an inexperienced pilot will certainly do more damage to their helicopter than they want to.
- Find yourself a wide area (about 10-15 foot square) to learn in. My attempts on the bed (which obviously is in an enclosed space) has caused more damage than intended. At this point I would recommend not going outside unless it is a calm day, slight cross winds can cause more difficulty for an inexperienced pilot. if you do go outside, then very short grass in a nice big open area is where you want to be. Long grass can cause the tail rotor to jam and will definately make you crash even before you get off the ground! (I know I've been there!)
- When mounting the battery into the battery holder... I recommend mounting the battery as far forward as possible to maintain good balance. If you have the LiPo battery then I also recommend a small piece of tape to secure it, as minor bumps and jolts easily knock the battery loose causing instability in the balance.
- Don't fly too high too quickly. It feels really easy to get the helicopter high in the air, but the higher they are the harder they fall. I would stick to about 3ft off the ground until you are fully familiar with the controls of your honey bee FP helicopter.
- Make sure you check the balance of the main rotor and the angle of the paddles. Slight downward force on the paddles seems to make it easier for hovering your honeybee, but you will want to adjust these as you get more experienced, so that you have quicker response and better maneuverability later on.
- Attach the battery and wait until the green light (inside the helicopter) has stopped flashing. This allows the Gyro to adjust correctly. This is mentioned in the wiki anyway, but I just thought I would mention it again.
- Before you take off, position the helicopter in front of you facing away from you. That way the movements you make on the controls make the helicopter move in the correct direction. Its hard enough to fly this thing without not knowing which direction the helicopter will fly in!
- On take-off the helicopter tends to lean to the left, do not trim this adjustment as once it is off the ground (providing it is balanced) it will level out. As you take off you should adjust the balance on the controls with TINY movements.
- Always make small precise movements on the sticks. I found myself making too large movements on my right stick causing the heli to lose control easily and making it hard to correct.
The most important of all the tips above is the very first one! Read the wiki it helped me set-up and "know what to look for" with my heli. Don't try and fly straight out of the box, particularly if you have never flown an RC helicopter before. I learnt this the hard way and had to purchase spares within one day of getting it out of the box!
Recommended pre-flight spares/accessories for Honeybee FP Helicopter:
- Ring like Push rod EK1-0201
http://www.buzzflyer.co.uk/ESky-Honey-Bee-Spares/Honey-Bee-Ring-Like-Push-Rod---EK1-0201/p-88-173/ - Vertical fin set EK1-0216A
http://www.buzzflyer.co.uk/ESky-Honey-Bee-Spares/Honey-Bee--CP2-Vertical-Fin-Set---EK1-0216/p-88-170/ - Tail rotor housing EK1-0215
http://www.buzzflyer.co.uk/ESky-Honey-Bee-Spares/Tail-Rotor-Housing---EK1-0215/p-88-168/ - Main Rotor blade set EK1-0202
http://www.buzzflyer.co.uk/ESky-Honey-Bee-Spares/Honey-Bee-Main-Blade-Set---EK1-0202/p-88-175/ - Tail rotor blade (standard plastic) EK1-0219
http://www.buzzflyer.co.uk/ESky-Honey-Bee-Spares/Honey-Bee-and-CP2-Tail-Rotor---EK1-0219/p-88-163/ - Tail rotor blade (Carbon Fibre Upgrade - much lighter)
http://www.buzzflyer.co.uk/ESky-Honey-Bee-Spares/Honey-BeeCP2-Carbon-Fibre-Tail-Rotor/p-88-344/
BuzzFlyer also do a "Crash Repair Kit" which includes many of the parts above. Take a look at their site. And the support via email I have had from them has also been great.
- BuzzFlyer Crash Repair Kit
http://www.buzzflyer.co.uk/ESky-Honey-Bee-Spares/Honey-Bee-Crash-Kit/p-88-847/
Happy flying!
Monday, 7 January 2008
Mastering the Hover
Day 5
Woohoo! First time and I was up in the air hovering happily for over 5 mins, only lost control a couple of times but managed to land safely (but again a little too quickly) on the bed. I am slowly getting used to controlling the little blighter!
My tiny movements on the sticks are improving with each flight, and I was confident for 15 mins or so that I was successfully flying (well hovering) my Honeybee. Alas, the third flight I had a Jack Douglas (Carry On) moment and pulled too hard on the back stick and the heli flew directly towards me and I completely lost control. Alas I crashed into the bed room wall just missing my face with the tail rotor. Once again broke one of the tiny 'o' clips that hold the main rotor blade to the flybar. Fortunately I have replacements in my crash repair kit, but looks like I'll be buying a few more of those very soon at this rate!
I feel that this crash was entirely due to the small amount of space I am trying to learn in. I think I need to get out into a larger space, and lose the security of the soft bed to land on!
Never give up, Never surrender! (Galaxy Quest)
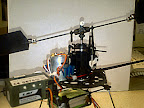
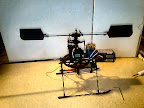
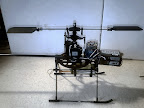
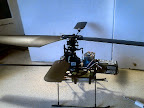
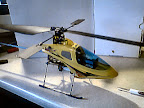
My ESky Honey Bee FP Photos
Here are a few pictures of my ESky Honey Bee FP helicopter, so you all know what I am talking about when I write about my honeybee fp.
My Honeybee FP Rotors off, with training set on! (the dorky looking yellow balls attached to the skids, ugly but necessary!)
Rotors spinning, but not at hover. I am on my own here, can't get it hovering and take pictures of it at the same time!
Ooooh look, a different angle!
Heheh, slightly closer, but yet another angle.
The cat was on the bed when I took it in to take the pics, lets just say she didn't stay on the bed long once the rotors spun up. Poor thing, she looked terrorised!
Sunday, 6 January 2008
Honeybee FP Hover? OH YES!
Day 4
Today I went for it again, decided to stick to the soft landing of the bed for a while longer while I get used to tight spaces and the controls of my Honeybee FP heli.
So anyway, I straightened out the main prop, switched on the transmitter and attached the battery. Took a slightly different approach this time... Brought the power up 1/6th of the way so the heli was spinning tail and main prop but stationery, adjusted the turn so the heli was stable and then went to a low hover speed and there she blows!
I am amazed, I actually managed to hover it today about 2ft off the bed, and for over 1 minute! I am so pleased with myself! My control is a bit "worse for wear" as I am continuously over adjusting the left/right bank and easily losing control, but I managed to land it safely (albeit a little too quickly) onto the centre of my bed.
Managed to do this a few times, so I am obviously managing to learn how to control this thing. Alas my final attempt once again caught the tail fin and snapped it off again! Another repair needed for that now, but at least I didn't damage it as much this time. A bit of superglue will fix that.
Right, I'm off to fix the tail fin, and get ready for the next time!
Saturday, 5 January 2008
Learning to fly! - ESky Honeybee FP
Shortly after christmas I got my ESky Honeybee FP R/C helicopter. My first thoughts were... EXCELLENT! I've always wanted an R/C helicopter, and now I have one! Check out BuzzFlyer (http://www.buzzflyer.co.uk/) which is where I purchased mine from.
DAY 1.
Got it out of the box, and set it all up, never having flown before I decided to put the training set on the bottom which gives it a wider base and makes it "a little" more safe to learn, hopefully avoiding tipping.
I read an excellent Wiki (http://www.eflightwiki.com/eflightwiki/index.php?title=HoneyBeeFP) for the HoneyBee and followed a number of setup basics before I even tried to do anything else (meanwhile the battery was charging!)
Well, my first flight, technically wasn't a flight! I just fired up the heli on my king size bed (as I thought that if anything nasty happens then at least it would have a soft landing. And got it to "hover" (and I use the term loosely) approximately 4mm off the bed (LOL). Did this until the battery was drained, and then put then second battery on. By this time it was already 11:30pm, and as my wife wanted to go to bed an attempt to hover over her would have probably been fatal (for me more than anything!).
DAY 2
Decided to be a bit more adventurous and took the heli out into the garden. I managed to get it airborne for a few seconds from our garden table, and then softly "crashed" into the grass. I re-aligned the main rotor and checked everything (as the wiki says) and tried a lift off from the grass.
Unfortunately the grass is a little long and the tail rotor got caught sending the heli completely side ways and breaking several small components rendering the heli un-flyable. I immediately got onto the BuzzFlyer web site and ordered a crash repair kit.
DAY 3
The repair kit came the following day (BuzzFlyer are efficient and speedy delivery - recommended) so this morning I set to repair the broken bits and pieces and was ready to fly again in a couple of hours.
At this point I decided to go back to the bed method. I have now managed to hover the heli, but not entirely stable, (I didn't realise how hard and frustrating this could be) for about 1 min, jerking madly from side to side and front to back. Then landing (sometimes softly on the bed, but mostly softly against the floor or wall!) and starting again from step one. Boy this is a tough one, but I will never give up until I am whizzing round a field somewhere!
Watch this space, will be adding pics etc soon!